Difference between revisions of "Dynamic Simulation Tutorial with DWSIM and Python, Part 4: Tuning the PID Controller through Non-Linear Optimization"
(Created page with "<div id="mw-content-text" lang="en" dir="ltr" class="mw-content-ltr"><table style="color: white; background-color: steelblue;" cellpadding="10" width="100%"> <tbody><tr> <td c...") |
|||
| Line 1: | Line 1: | ||
<div id="mw-content-text" lang="en" dir="ltr" class="mw-content-ltr"><table style="color: white; background-color: steelblue;" cellpadding="10" width="100%"> | <div id="mw-content-text" lang="en" dir="ltr" class="mw-content-ltr"><table style="color: white; background-color: steelblue;" cellpadding="10" width="100%"> | ||
| − | + | <tr> | |
<td colspan="1"> [[File:Dialog-warning.png]] This tutorial requires advanced or above average Python programming skills. | <td colspan="1"> [[File:Dialog-warning.png]] This tutorial requires advanced or above average Python programming skills. | ||
</td></tr> | </td></tr> | ||
| − | + | </table> | |
<table style="color: white; background-color: steelblue; margin-top: 5px" cellpadding="10" width="100%"> | <table style="color: white; background-color: steelblue; margin-top: 5px" cellpadding="10" width="100%"> | ||
| − | + | <tr> | |
<td colspan="1"> [[File:Dialog-information.png]] You'll need at least <b>DWSIM v5.1 or newer</b> on Windows, Linux or macOS to follow/reproduce the tasks within this tutorial. | <td colspan="1"> [[File:Dialog-information.png]] You'll need at least <b>DWSIM v5.1 or newer</b> on Windows, Linux or macOS to follow/reproduce the tasks within this tutorial. | ||
</td></tr> | </td></tr> | ||
| − | </ | + | </table><br/> |
<h1><span class="mw-headline" id="Introduction">Introduction</span></h1> | <h1><span class="mw-headline" id="Introduction">Introduction</span></h1> | ||
<p>We can use built-in DWSIM non-linear optimizers to tune our PID controller by finding a parameter set (Kp, Ki, Kd) which minimizes the total error between the set-point and process variable during the whole simulation period. | <p>We can use built-in DWSIM non-linear optimizers to tune our PID controller by finding a parameter set (Kp, Ki, Kd) which minimizes the total error between the set-point and process variable during the whole simulation period. | ||
Revision as of 19:31, 1 July 2019
| |
| |
Contents
Introduction
We can use built-in DWSIM non-linear optimizers to tune our PID controller by finding a parameter set (Kp, Ki, Kd) which minimizes the total error between the set-point and process variable during the whole simulation period.
Setup
Modify the 'RunDynamicProcess_ClosedLoop' to read the PID parameters stored in the PID Controller, by changing
P = 0.5
I = 0.01
D = 0.1
to
P = controller.ExtraProperties.Kp
I = controller.ExtraProperties.Ki
D = controller.ExtraProperties.Kd
When you save the simulation, the latest parameter values will be saved as extra properties of the PID Controller object.
You can comment the chart generation lines so you won't get a chart window at each optimizer iteration:
#outputresults = Flowsheet.Scripts.Values.Where(lambda x: x.Title == 'GenerateCharts').FirstOrDefault().ScriptText.replace('\r', '')
#exec(outputresults)
Tuning the PID Controller using the Simplex method
Create a new script and name it 'TunePID_Simplex', with the following content:
import clr
import System
from System import *

clr.AddReference('DWSIM.MathOps.DotNumerics')
clr.AddReference('System.Core')
clr.ImportExtensions(System.Linq)

from System import Func

from DotNumerics import *
from DotNumerics.Optimization import *

controller = Flowsheet.GetFlowsheetSimulationObject("PID Controller")

controller.ExtraProperties.Kp = 0.5
controller.ExtraProperties.Ki = 0.01
controller.ExtraProperties.Kd = 0.1

P = controller.ExtraProperties.Kp
I = controller.ExtraProperties.Ki
D = controller.ExtraProperties.Kd

simplex = Simplex()

Pvar = OptBoundVariable(P, 0.0, 10.0)
Ivar = OptBoundVariable(I, 0.0, 10.0)
Dvar = OptBoundVariable(D, 0.0, 10.0)

vars = [Pvar, Ivar, Dvar]

tx0 = DateTime.Now

counter = 1

def RunIteration(vars):
    global counter
    Flowsheet.SupressMessages = False
    Flowsheet.WriteMessage("Run #" + str(counter))
    Flowsheet.WriteMessage("P = " + str(controller.ExtraProperties.Kp))
    Flowsheet.WriteMessage("I = " + str(controller.ExtraProperties.Ki))
    Flowsheet.WriteMessage("D = " + str(controller.ExtraProperties.Kd))
    controller.ExtraProperties.Kp = vars[0]
    controller.ExtraProperties.Ki = vars[1]
    controller.ExtraProperties.Kd = vars[2]
    Flowsheet.SupressMessages = True
    itloop = Flowsheet.Scripts.Values.Where(lambda x: x.Title == 'RunDynamicProcess_ClosedLoop').FirstOrDefault().ScriptText.replace('\r', '')
    exec(itloop)
    Flowsheet.SupressMessages = False
    Flowsheet.WriteMessage("Error = " + str(controller.ExtraProperties.TotalError))
    counter += 1
    return controller.ExtraProperties.TotalError

simplex.Tolerance = 0.000001
simplex.MaxFunEvaluations = 1000
simplex.ComputeMin(lambda x: RunIteration(x), Array[OptBoundVariable](vars))

tx1 = DateTime.Now

controller.ExtraProperties.TotalTuningTime = (tx1 - tx0).TotalSeconds
Run the above script. It can take several hours to complete, depending on your system's processing power.
Tuning the PID Controller using IPOPT
Create a new script and name it 'TunePID_IPOPT', with the following content:
import clr
import System
from System import *

clr.AddReference('Cureos.Numerics')
clr.AddReference('System.Core')
clr.ImportExtensions(System.Linq)

from System import Func

from Cureos.Numerics import *

controller = Flowsheet.GetFlowsheetSimulationObject("PID Controller")

controller.ExtraProperties.Kp = 0.5
controller.ExtraProperties.Ki = 0.01
controller.ExtraProperties.Kd = 0.1

P = controller.ExtraProperties.Kp
I = controller.ExtraProperties.Ki
D = controller.ExtraProperties.Kd

lconstr = [0.0, 0.0, 0.0]
uconstr = [10.0, 10.0, 10.0]
vars = [P, I, D]

tx0 = DateTime.Now

counter = 1

Flowsheet.SupressMessages = False

def RunIteration(vars):
    global counter
    Flowsheet.SupressMessages = False
    Flowsheet.WriteMessage("Run #" + str(counter))
    Flowsheet.WriteMessage("P = " + str(controller.ExtraProperties.Kp) + ", I = " + str(controller.ExtraProperties.Ki) + ", D = " + str(controller.ExtraProperties.Kd))
    controller.ExtraProperties.Kp = vars[0]
    controller.ExtraProperties.Ki = vars[1]
    controller.ExtraProperties.Kd = vars[2]
    Flowsheet.SupressMessages = True
    itloop = Flowsheet.Scripts.Values.Where(lambda x: x.Title == 'RunDynamicProcess_ClosedLoop').FirstOrDefault().ScriptText.replace('\r', '')
    exec(itloop)
    Flowsheet.SupressMessages = False
    Flowsheet.WriteMessage("Error = " + str(controller.ExtraProperties.TotalError))
    counter += 1
    return controller.ExtraProperties.TotalError

def CalculateGradient(x):
    epsilon = 0.001
    x1 = [0.0, 0.0, 0.0]
    x2 = [0.0, 0.0, 0.0]
    g = [0.0, 0.0, 0.0]
    for j in range(0, x.Length):
        for k in range(0, x.Length):
            x1[k] = x[k]
            x2[k] = x[k]
        x1[j] = x[j] + epsilon
        x2[j] = x[j] - epsilon
        f1 = RunIteration(x1)
        f2 = RunIteration(x2)
        g[j] = (f2 - f1) / (x2[j] - x1[j])
    return Array[Double](g)

def func(n, x, new_x, obj_value):
    obj_value.Value = RunIteration(x)
    return True

def gradfunc(n, x, new_x, grad_f):
    grad_f.Value = CalculateGradient(x)
    return True

ipopt = Ipopt(3, Array[float](lconstr), Array[float](uconstr),
                0, None, None, 0, 0,
                lambda n, x, new_x, obj_value: func(n, x, new_x, obj_value),
                lambda n, x, new_x, m, g: True,
                lambda n, x, new_x, grad_f: gradfunc(n, x, new_x, grad_f),
                lambda n, x, new_x, m, nele_jac, iRow, jCol, values: False,
                lambda n, x, new_x, obj_factor, m, lambda0, new_lambda0, nele_hess, iRow, jCol, values: False)

obj = clr.Reference[float]()

ipopt.AddOption("tol", 0.000001)
ipopt.AddOption("max_iter", 1000)
ipopt.AddOption("mu_strategy", "adaptive")
ipopt.AddOption("hessian_approximation", "limited-memory")
status = ipopt.SolveProblem(Array[float](vars), obj, None, None, None, None)

print status

tx1 = DateTime.Now

controller.ExtraProperties.TotalTuningTime = (tx1 - tx0).TotalSeconds
Run the above script. It can take several hours to complete, depending on your system's processing power.
Viewing Tuning Results
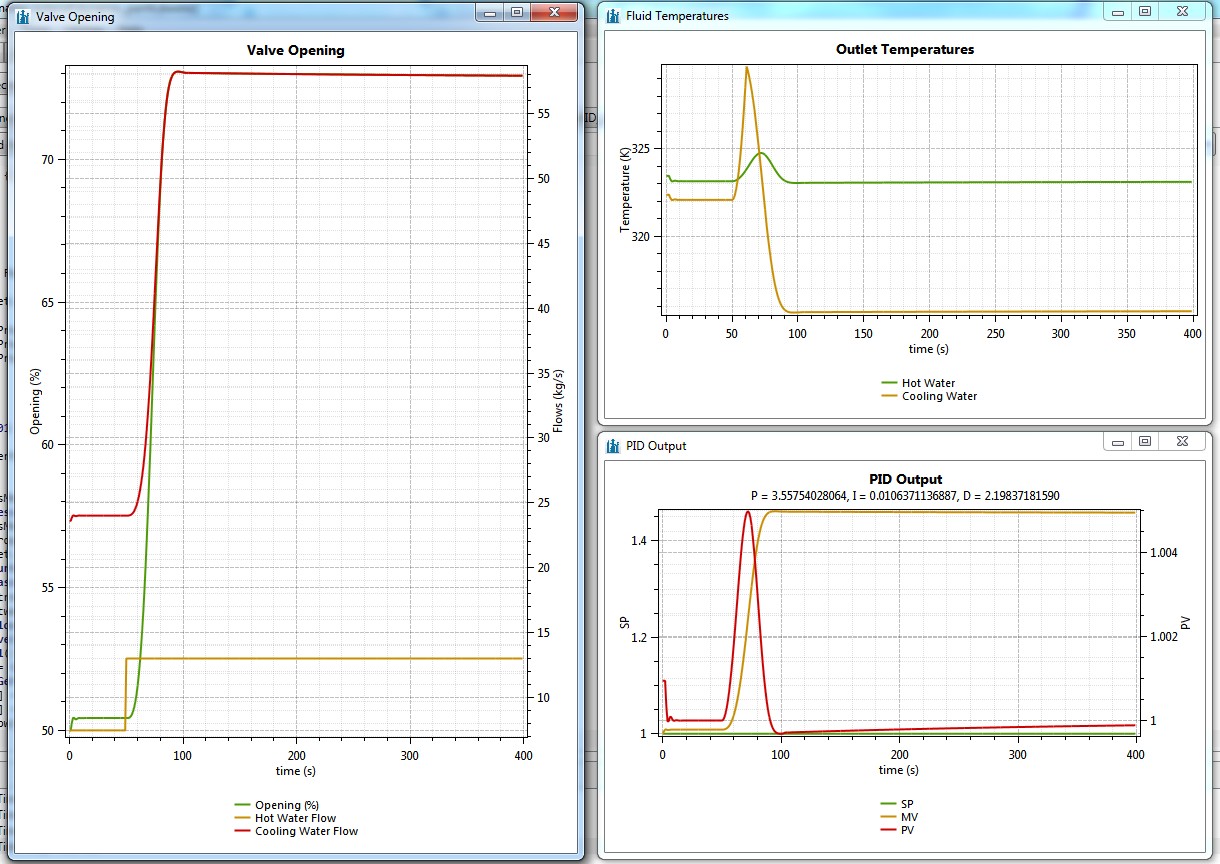
After successfully tuning the PID, you should get charts that look like the following ones:
Download File
Download the simulation file with what has been done so far: dynamic_part4.dwxmz
Return to Dynamic Simulation Tutorial with DWSIM and Python, Part 3: Adding a PID Controller
